Sunday, 14 June 2015

How to hack facebook new method june 2015


              Hello friends welcome back...Today I teach you how to hack facebook in new method. This is very complicated and 100% working method. So you dont worry about this post. But I cant tell this hacking method in public. because of some security problem will come. So I request you to send me the Email for the detailed explanation. Send the mail on>> "  earningpartners@gmail.com ".
       

Labels: ,

Saturday, 11 January 2014

How to make a hiding folder windows 7 trick

Keep Folders Hidden- Follow below steps


  • first create a new folder somewhere on your hard drive
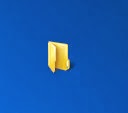
  • when you name it hold down "Alt" and press "0160" this will create and invisible space so it will apper as if it has no name.

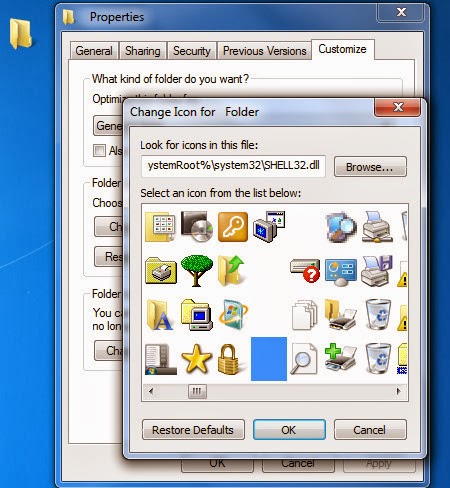
  • then right click in and select "Properties" select the tab "coustimize" and select "change icon" scroll along and you should a few blanc spaces click on any one and click ok when you hav saved the settings the folder will be invisible to hide all your personal files 


Labels: , ,

Friday, 10 January 2014

How to speed up windows xp booting

Boot Winxp Fast

Follow the below steps

1. Open notepad.exe, type "del c:\windows\prefetch\ntosboot-*.* /q" (without the quotes) & save as "ntosboot.bat" in c:\
2. From the Start menu, select "Run..." & type "gpedit.msc".
3. Double click "Windows Settings" under "Computer Configuration" and double click again on "Shutdown" in the right window.
4. In the new window, click "add", "Browse", locate your "ntosboot.bat" file & click "Open".
5. Click "OK", "Apply" & "OK" once again to exit.
6. From the Start menu, select "Run..." & type "devmgmt.msc".
7. Double click on "IDE ATA/ATAPI controllers"
8. Right click on "Primary IDE Channel" and select "Properties".
9. Select the "Advanced Settings" tab then on the device or 1 that doesn't have 'device type' greyed out select 'none' instead of 'autodetect' & click "OK".
10. Right click on "Secondary IDE channel", select "Properties" and repeat step 9.
11. Reboot your computer.


Its vey easy, but do carefully...Try it and rate your comment.

Labels: , , ,

Thursday, 9 January 2014

How to update windows without Internet connection latest

           Update windows os without internet connection . This works for all windows OS (Window 7/Vista/XP). i hope you really enjoy it . Follow The Below steps For Do this.... 
  • First Carry your Pen Drive and Go to your nearby Cyber Cafe then download Autopatcher software .
  • After downloading this software just install and run it. 
  • It will prompt you to select the OS for which you want to download the updates and click on Next button.
  • Now Select your OS whether it is 32-bit or 64-bit supported. If it is 32-bit then select X86 otherwise select X64 and click on Next button. 
  • A list of all updates for your OS will be shown. Select all the Updates and click on Download button. 
  • After finishing the download just copy/paste all the downloaded updates in your Pen Drive. Now insert this Pendrive into your system for which you have downloaded all these updates and install them.


windows update resultThat’s it! This is the best method to install the updates in Offline mode and secure your PC.
Hey guys give ur comment

Labels: , ,

Wednesday, 8 January 2014

How to update Bios latest step by step

Warning: This is an olden article and the contents of information may be changed.


BIOS Update Procedure

All latest Motherboards today, 486/ Pentium / Pentium Pro etc.,ensure that upgrades are easily obtained by incorporating the system BIOS in a FLASH Memory component. With FLASH BIOS, there is no need to replace an EPROM component. Once downloaded, the upgrade utility fits on a floppy disc allowing the user to save, verify and update the system BIOS. A hard drive or a network drive can also be used to run the newer upgrade utilities. However, memory managers can not be installed while upgrading.


Most pre-Pentium motherboards do not have a Flash BIOS. The following instructions therefore do not apply to these boards. If your motherboard does not have a Flash BIOS (EEPROM) you will need to use an EPROM programmer to re-program the BIOS chip. See your dealer for more information about this.

Please read the following instructions in full before starting a Flash BIOS upgrade:
A. Create a Bootable Floppy (in DOS)

•With a non-formatted disk, type the following:

format a:/s

•If using a formatted disk, type:

sys a:

This procedure will ensure a clean boot when you are flashing the new BIOS.

B. Download the BIOS file

•Download the correct BIOS file by clicking on the file name of the BIOS file you wish to download.

•Save the BIOS file and the Flash Utility file in the boot disk you have created. Unzip the BIOS file and the flash utility file. If you don't have an "unzip" utility, download the WinZip for Windows 95 shareware/ evaluation copy for that one time use from _www.winzip.com or _www.pkware.com. Most CD ROMs found in computer magazines, have a shareware version of WinZip on them.

•You should have extracted two files:

Flash BIOS utility eg: flash7265.exe (for example)

BIOS eg: 6152J900.bin (example)

Use the latest flash utility available unless otherwise specified (either on the BIOS update page or in the archive file). This information is usually provided.

C. Upgrade the System BIOS

During boot up, write down the old BIOS version because you will need to use it for the BIOS backup file name.

Place the bootable floppy disk containing the BIOS file and the Flash Utility in drive a, and reboot the system in MS-DOS, preferably Version 6.22

•At the A:> prompt, type the corresponding Flash BIOS utility and the BIOS file with its extension.

For example:

flash625 615j900.bin


•From the Flash Memory Writer menu, select "Y" to "Do you want to save BIOS?" if you want to save (back up) your current BIOS (strongly recommended), then type the name of your current BIOS and its extension after FILE NAME TO SAVE: eg: a:\613J900.bin

Alternatively select "N" if you don't want to save your current BIOS. Beware, though, that you won't be able to recover from a possible failure.

•Select "Y" to "Are you sure to program?"

•Wait until it displays "Message: Power Off or Reset the system"

Once the BIOS has been successfully loaded, remove the floppy disk and reboot the system. If you write to BIOS but cannot complete the procedure, do not switch off, because the computer will not be able to boo, and you will not be given another chance to flash. In this case leave your system on until you resolve the problem (flashing BIOS with old file is a possible solution, provided you've made a backup before)

Make sure the new BIOS version has been loaded properly by taking note of the BIOS identifier as the system is rebooting.

For AMI BIOS
Once the BIOS has been successfully loaded, remove the floppy disk and reboot the system holding the "END" key prior to power on until you enter CMOS setup. If you do not do this the first time booting up after upgrading the BIOS, the system will hang.

BIOS Update Tips

note:
1.Make sure never to turn off or reset your computer during the flash process. This will corrupt the BIOS data. We also recommend that you make a copy of your current BIOS on the bootable floppy so you can reflash it if you need to. (This option is not available when flashing an AMI BIOS).

2. If you have problems installing your new BIOS please check the following:

Have you done a clean boot?
In other words, did you follow the above procedure for making a bootable floppy? This ensures that when booting from "A" there are no device drivers on the diskette. Failing to do a clean boot is the most common cause for getting a "Memory Insufficient" error message when attempting to flash a BIOS.

If you have not used a bootable floppy, insure a clean boot either by

a) pressing F5 during bootup

b) by removing all device drivers on the CONFIG.SYS including the HIMEM.SYS. Do this by using the EDIT command.

Have you booted up under DOS?
Booting in Windows is another common cause for getting a "Memory Insufficient" error message when attempting to flash a BIOS. Make sure to boot up to DOS with a minimum set of drivers. Important: Booting in DOS does not mean selecting "Restart computer in MS-DOS Mode" from Windows98/95 shutdown menu or going to Prompt mode in WindowsNT, but rather following the above procedure (format a: /s and rebooting from a:\).

Have you entered the full file name of the flash utility and the BIOS plus its extension?
Do not forget that often you will need to add a drive letter (a:\) before flashing the BIOS. Example: when asked for file name of new BIOS file which is on your floppy disk, in case you're working from c:\ your will need to type a:\615j900.bin, rather than 615j900.bin only.


Note: we are not respossible for any kind of mistaken

Labels: , ,

Monday, 23 December 2013

How to create a bootable USB for ubuntu OS

Should Know about Ubuntu

Linux was already established as an enterprise server platform in 2004, but free software was not a part of everyday life for most computer users. That's why Mark Shuttleworth gathered a small team of developers from one of the most established Linux projects – Debian – and set out to create an easy-to-use Linux desktop: Ubuntu.
The vision for Ubuntu is part social and part economic: free software, available to everybody on the same terms, and funded through a portfolio of services provided by Canonical.
To run Ubuntu from a USB stick, the first thing you need to do is insert a USB stick with at least 2GB of free space into your PC.

To Know more about ubuntu click here 

Now lets come on How to bootable a ubuntu using USB
Note:-To run Ubuntu from a USB stick, the first thing you need to do is insert a USB stick with at least 2GB of free space into your PC.

STEP1: First of all you need to install the software to create a bootable USB thats called Universal USB Installer

STEP 2: Open the software and select the below category from the list


STEP 3: Click on Browse button and open your downloaded ubuntu ISO file


STEP 4: After opening the file click on Create button to make a bootable USB,
This may take a few minutes . Wait for that


Note: Please don't remove pendrive while its running for creating the bootable file

Labels: ,